With a wide range of Magento 2 performance optimization tips and tricks on the Internet, e-commerce owners shouldn’t be worried about slow-loading websites. However, even a robust and highly scalable platform like Magento 2 can annoy its users with the timing issue. Moreover, retailers often experience negative results from implementing random techniques without investigating the core problems. That’s when the need for speed optimization arises, and business owners start to look for the right services. Before diving deep into the technical details of Magento 2 speed optimization, let’s investigate the main signs and causes of slow website loading time.

Top 3 Wake Up Calls of Magento Slow Website Performance
According to research, an e-commerce company that sells $100,000 per day can potentially lose $2.5 million a year just because of a one-second page delay. So, what are the reasons behind the loss? Check out the red flags that should be taken into consideration:
- Low Google Ranking. It is well-known that website speed is one of the main aspects Google uses to rank sites. In other words, poor performance can hurt your entire SEO strategy that is developed for moving your online store up in search results.
- Low Sales KPIs. If your efforts put into developing and promoting your company don’t pay off, as well as seeing the traffic and conversion rates are low, it is recommended to check the website speed. Today’s potential clients are impatient to wait until the website loads, so they leave without any engagement.
- Poor Customer Experience. If surfing through your own website provokes a hint of irritation at slow loading pages, the visitors will most likely have the same experience.
All in all, if you notice some of the above-mentioned issues while running the online business or feel that your shop loses in speed to competitors, it is definitely the time to accelerate your Magento performance.
How to Determine the Magento Speed Problem
To identify performance issues and improve Magento 2 site speed, testing tools can help translate assumptions into measurable data. Popular options include WebPageTest, Mage Speed Test, Google PageSpeed Insights (web.dev), GTmetrix, and Magento-focused testing tools.
By entering your store’s URL, these tools provide reports on page load times, detected bottlenecks, and general optimization recommendations.In addition to lab-based metrics, many tools now highlight Core Web Vitals, which reflect real user experience and play an important role in search visibility. While speed test results are useful for diagnostics and ongoing monitoring, their recommendations are typically based on general best practices and may not fully reflect how a specific Magento store behaves under real traffic conditions. For this reason, test results should be treated as indicators rather than direct instructions to apply every suggested change.
Magento 2 Speed Optimization: 7 Hints to Boost Site Performance
Now, when you determined the speed problem of your Magento 2 e-store, your first task is to understand that optimizing the Magento performance doesn’t mean changing just a few general settings. The process starts with identifying the reasons for slow performance and finding the right solution to fix the issues. Among the variety of tools and services floating around the web, you can take advantage of Magento 2 Speed Optimization Service provided by Plumrocket. It allows you to enhance search rankings, increase user engagement and boost conversion rates by analyzing the problems and applying the following tactics to your website:
- Choose the right hosting.
- Perform PHP and MySQL tuning.
- Minify and Merge JS, HTML, and CSS.
- Delete unnecessary extensions.
- Manage the cache.
- Configure a Content Delivery Network (CDN).
- Optimize images.
1. Choose the Right Hosting
Selecting fast and reliable hosting is one of the most fundamental aspects to consider before optimizing a Magento online store. A suitable hosting environment should not only provide fast connection speeds, strong security, and responsive technical support, but also meet Magento 2 technical requirements.
When choosing hosting for a Magento-based website, make sure the environment supports the following:
- Operating systems. The hosting of your Magento online business should be working on Linux, and Linux distributions like RedHat Enterprise Linux (RHEL), CentOS, Ubuntu, Debian, and others.
- Memory restrictions. Upgrading the Magento 2 extensions can require up to 2GB of RAM. If you are running a system with less than required memory size, there is a possibility of upgrade failure.
- Latest composer version. If you want to contribute to the Magento codebase, develop or install Magento modules, the composer should be included in your hosting.
- Web servers. Regarding the web servers, you can choose between Apache and NginX 1.x. Also, you should enable the Apache mod_rewrite and mod_version modules. More info here.
- Database. Magento 2.4 is compatible with MySQL 8.0, MariaDB 10.4, 10.5, 10.6. Magento is also compatible with Percona 5.7 and other binary-compatible MySQL technologies.
- PHP. The recommended PHP version for Magento 2.4.6 and 2.4.7 is PHP 8.1 and 8.2, while Magento 2.4.8 supports PHP 8.3 and PHP 8.4.
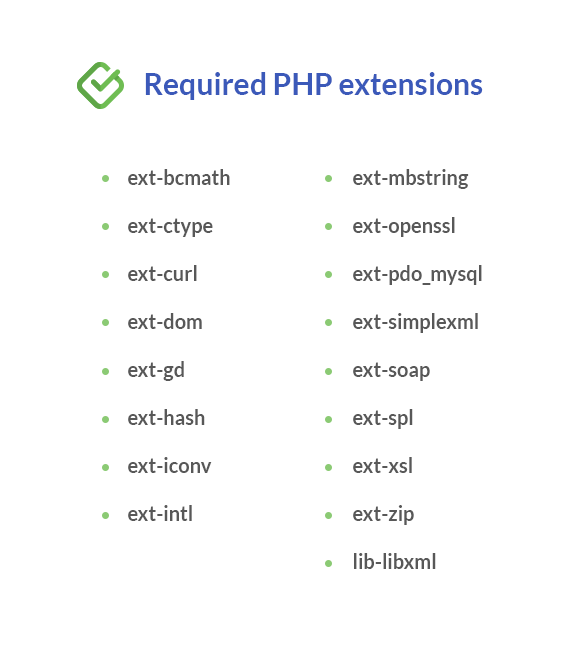
- PHP extensions. In order to expand PHP functionality, you can install different extensions. You can find the full list of required PHP extensions here.
- PHP OPcache. It is suggested to verify if PHP OPcache is enabled for performance reasons. The OPcache is enabled in many PHP distributions. In case you want to verify if it is installed, check out the PHP documentation. To find out the instructions on how to install it separately, consider the PHP OPcache documentation.
- PHP settings. PHP configuration settings can be memory_limit that can help you avoid the common issues while using Magento.
- SLL. If you want to provide the customers with better security, SSL certificates are required to be installed, and https website version is enabled. SSL is required for an efficient work of payment systems such as PayPal. Also, SSL is used to download the extensions via composer from Magento Marketplace or other platforms.
- System Dependencies. Some Magento operations require the following system tools: bash, gzip, lsof, mysql, mysqldump, nice, php, sed, tar.
Elasticsearch/OpenSearch. Starting with Magento 2.4, Elasticsearch is a required component. Magento 2.4.4+ supports Elasticsearch 7.16, 7.17, 8.x, or OpenSearch 1.2, 2.x.
By and large, the recommendations above represent the minimum requirements for successful Magento website optimization. However, Magento performance is influenced by many interconnected factors, and no single configuration change can fully resolve speed issues on its own. In addition to proper hosting setup, a range of software solutions can further improve Magento speed and stability, including Redis, Varnish, Elasticsearch, and a Content Delivery Network (CDN).
2. PHP and MySQL Tuning
After selecting and configuring the desired hosting, the next step is to perform PHP and MySQL tuning. This is a core part of Magento performance tuning, especially for stores experiencing slow backend operations or database-related bottlenecks. Thus, in order to run a process efficiently, check out the instructions below.
How to Perform PHP Tuning
If you want to execute PHP tuning, the setup of optimal values in ‘php.ini’ (PHP configuration file) is one of the tasks to consider.
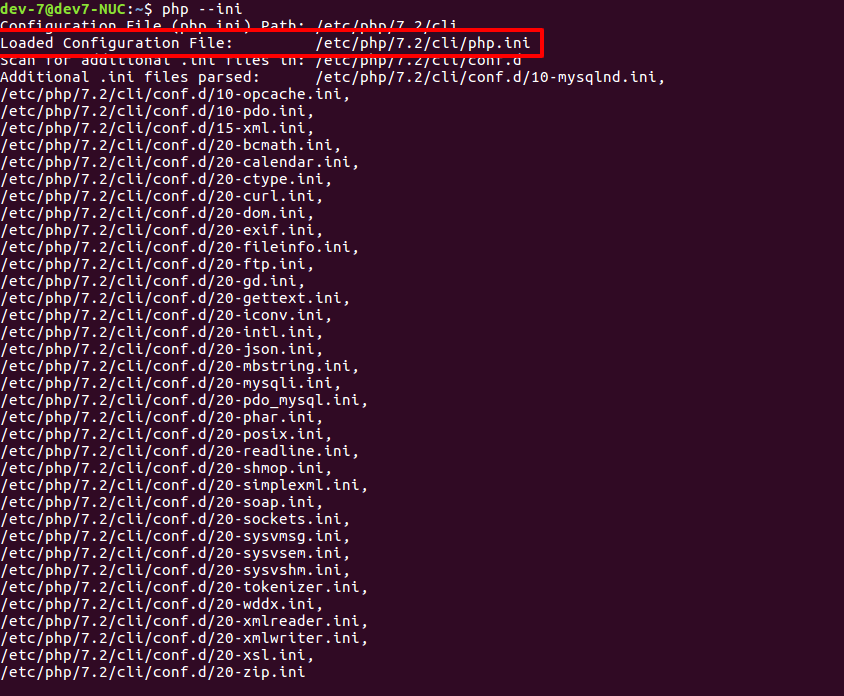
1. The first step is to find ‘php.ini’. There are 2 different ways to perform the process:
a) Open the console, run php –ini and look for Loaded Configuration File in output for the location of php.ini used by your CLI. Example of the output:
b) Create a file ‘phpinfo.php’ (for example, you can create this file in the Magento root folder) and insert the code:
&lt;!--?php phpinfo(); ?--&gt;c) Then, open this file in the browser, e.g. https://<your_site_url>/phpinfo.php
d) After that, find the location of your ‘php.ini’ file in the opened window. For instance:

2. Once the path to ‘php.ini’ is found, you need to open it and insert the new values. Check out an example of ‘php.ini’ setup for Magento 2:
memory_limit = 4G
max_input_time = 360
max_execution_time = 360
output_buffering = 4096
zlib.output_compression = on
How to Perform My SQL Tuning
MySQL performance tuning can help quickly determine bottlenecks, target insufficient operations through review of query execution plans and eliminate any guessing games. So, take the following steps to complete the task:
1) If you want to start MySQL tuning, open ‘my.cnf‘ file. To find this file, use the next command in the Console:
‘mysqld –help –verbose’You should get similar output:
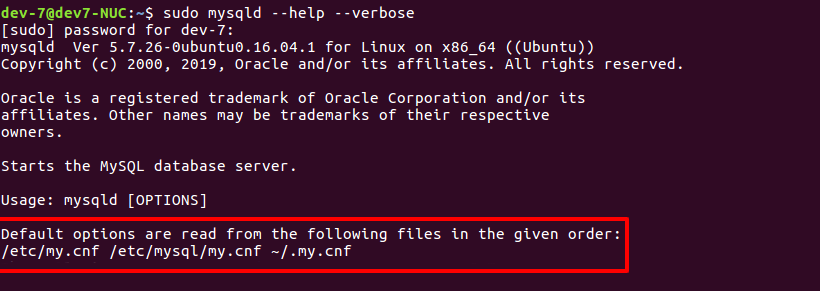
2) You will see a list of all ‘my.cnf’ in the first row, for example, Default options are read from the following files in the given order:
/etc/my.cnf /etc/mysql/my.cnf ~/.my.cnf3) Then, you can configure ‘my.cnf’, e.g.:
long_query_time =1
innodb_buffer_pool_size = [50% of RAM]
innodb_thread_concurrency = 2 * [numberofCPUs] + 2
innodb_flush_log_at_trx_commit = 2
thread_concurrency = [number of CPUs] * 3
thread_cache_size = 32
table_cache = 1024
query_cache_size = 64M
query_cache_limit = 2M
join_buffer_size = 8M
tmp_table_size = 256M
key_buffer = 32M
innodb_autoextend_increment=512
max_allowed_packet = 16M
max_heap_table_size = 256M
read_buffer_size = 2M
read_rnd_buffer_size = 16M
bulk_insert_buffer_size = 64M
myisam_sort_buffer_size = 128M
myisam_max_sort_file_size = 10G
myisam_max_extra_sort_file_size = 10G
myisam_repair_threads = 1
PHP and database configuration changes can significantly affect store stability if applied incorrectly. Values that work well for one Magento store may cause issues for another, depending on traffic volume and server resources.
It is recommended to apply such changes gradually and monitor Magento speed performance and error logs after each adjustment.
3. Minify and Merge JS, HTML, CSS
One of the essential steps in the Magento 2 performance improvement is minifying and merging JS, HTML, CSS, as well as bundling JS. So, in order to perform these tasks and reduce Magento 2 page loading time, you can follow the instructions below.
How to minify Javascript and CSS in Magento 2
1. First, open the Console and put Magento 2 in production mode:
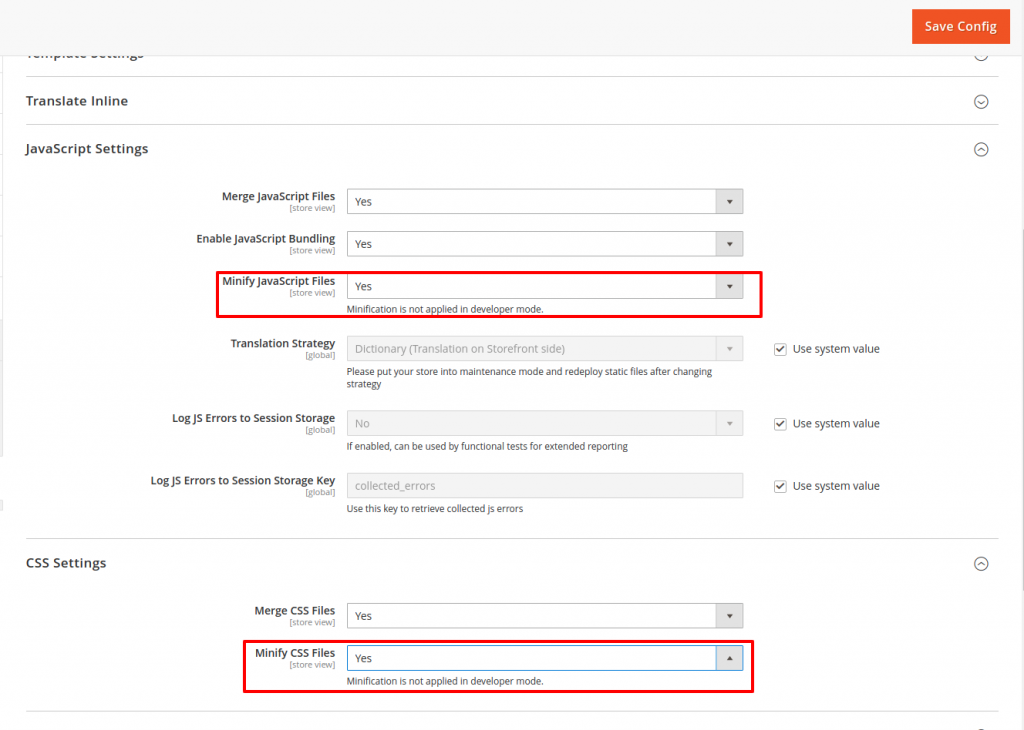
./bin/magento deploy:mode:set production2. Then, go to Stores > Configuration > Advanced > Developer.
3. Set Minify Javascript Files or CSS Files option to Yes.
4. After that, click Flush Cache on the System > Cache Management page.
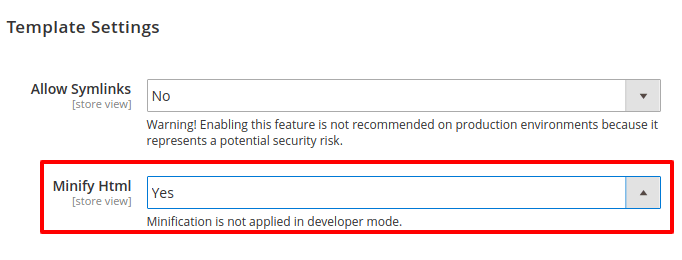
How to minify HTML in Magento 2
- First, put Magento 2 into production mode by executing the following command:
./bin/magento deploy:mode:set production- Then, go to Stores > Configuration > Advanced > Developer > Template Settings
- Set Minify HTML option to Yes.
- After that, click Flush Cache on the System > Cache Management page.
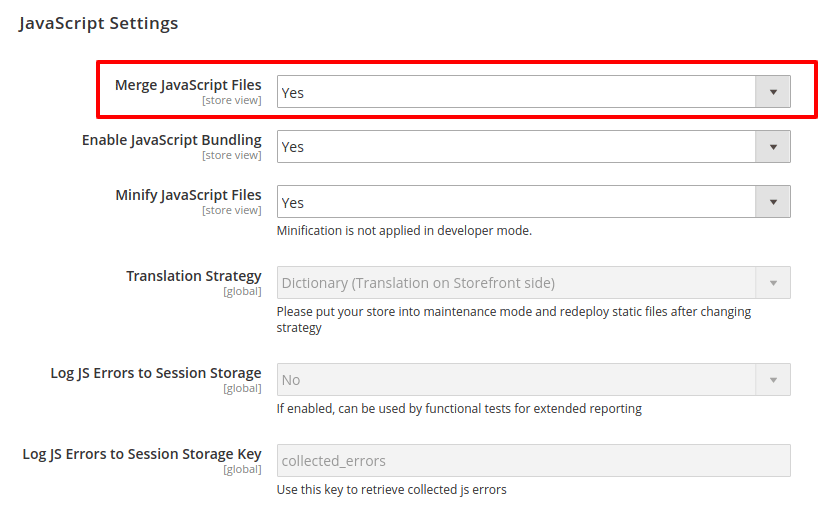
How to merge Javascript in Magento 2
- First, go to Stores > Configuration > Advanced > Developer.
- Open the JavaScript Settings section, and continue with the following:
- In the Merge JavaScript Files field, select Yes.
- When complete, click Save Config.
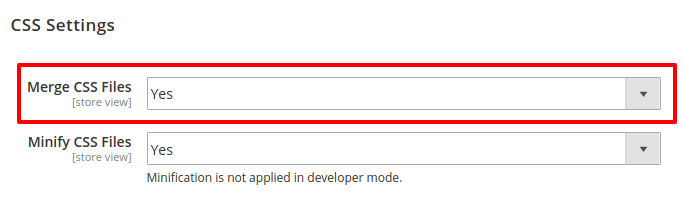
How to merge CSS in Magento 2
- First, go to Stores > Configuration > Advanced > Developer.
- Then, open the CSS Settings section, and continue with the following:
- In the Merge CSS Files field, select Yes
- When complete, click Save Config.
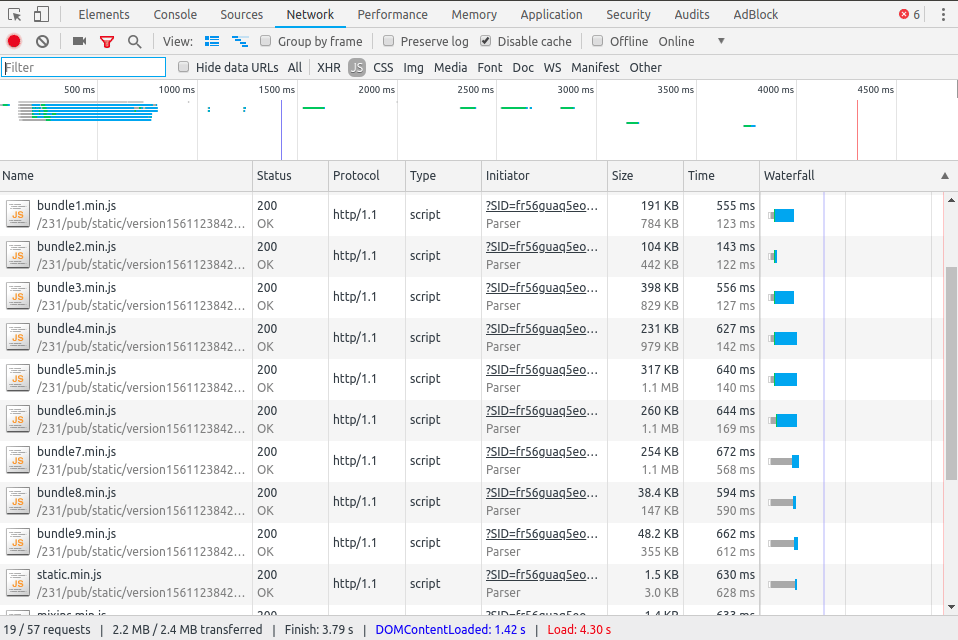
The following visual shows the results of bundling after all commands are executed:
How to Bundle JS in Magento 2
Open the Console and execute the commands below:
1. From the Magento root directory, switch to production mode:
php bin/magento deploy:mode:set production2. Enable JavaScript bundling:
php -f bin/magento config:set dev/js/enable_js_bundling 13. Optimize bundling by minifying JavaScript files:
php -f bin/magento config:set dev/js/minify_files 14. Enable cache busting on static file URLs. This ensures users get the latest version of the assets anytime they update:
php -f bin/magento config:set dev/static/sign 1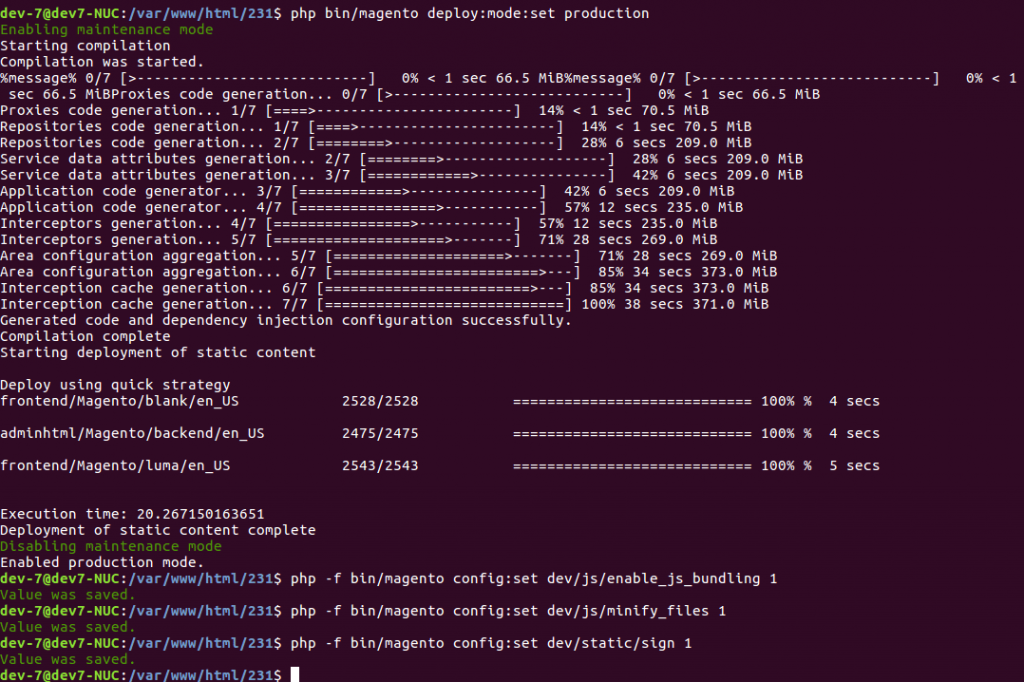
So, if you perform minifying, merging, and bundling activities on your Magento 2 website, the process of code optimization can help you improve the e-store performance, enhance user experience and increase sales.
4. Delete Unnecessary Extensions
If your Magento 2 platform includes a lot of extensions that are hardly or not used at all, it can not only affect your budget but also slow down the website speed. In this case, it is recommended to disable the unused plugins by taking the following steps:
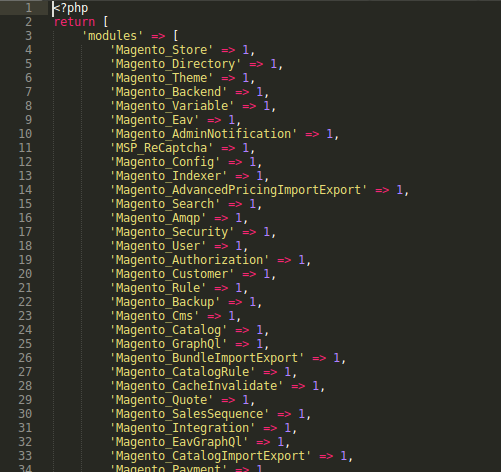
1. To easily find a list of installed modules on your Magento, open the file located here – <magento_directory>/app/etc/config.php. This file includes all extensions installed on your website, for example:
2. Then, choose the extensions that need to be disabled and select one of the ways to perform the task:
a) To disable the extension, open the file <magento_directory>/app/etc/config.php and set value “0” next to the extension name. For instance:
'Plumrocket_SocialLoginFree' =&gt; 1 is enabled module;
'Plumrocket_SocialLoginFree' =&gt; 0 is disabled module.b) Also, you can turn off the desired modules from the Console with command:
php bin/magento module:disable Plumrocket_SocialLoginFree3. After that, in order to complete disabling the extensions, you should execute the following commands in the console:
php bin/magento setup:upgrade
php bin/magento setup:di:compile
php bin/magento setup:static-contend:deploy -f
php bin/magento cache:flush
Thus, it is recommended to avoid turning off the Magento default plugins (starts with prefix Magento_ ), as well as making any other changes if you don’t have experience working with Magento.
5. Cache Management
Caching is one of the main parts of any web server. With a platform like Magento, it is essential to obtain the cache as it drastically reduces the site load time and speeds up the page response that leads to a better user experience. Since there are different forms of caching that can be implemented with Magento, installation of Varnish, Redis and Memcached software can help you optimize the website performance. So, let’s look closer at every technology and find out the setup process.
Varnish
Known as a reverse caching proxy, Varnish is a piece of software that you put in front of the website server to diminish the site loading time by caching the server’s output. Before setting up Varnish with your Magento 2, make sure that Varnish is installed on your server. Then, consider the following steps to set up Varnish with your Magento 2 online store:
- Sign in to the Magento Admin as an administrator.
- Click STORES > Settings > Configuration > ADVANCED > System > Full Page Cache.
- After that, press Varnish Caching from the Caching Application list
- Then, enter a value in the TTL for public content file
- In order to expand Varnish Configuration, provide the following info:
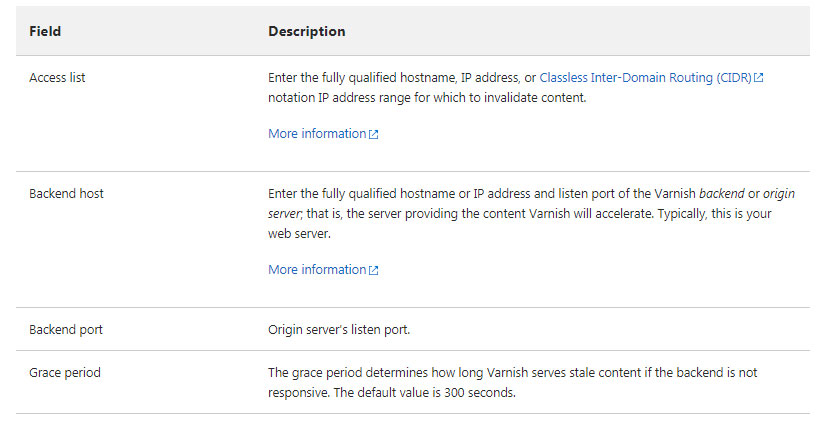
6. Click Save Config.
7. If you want to export a Varnish configuration file from the Admin panel:
- Click one of the export buttons to create a ‘varnish.vcl’ you can use with Varnish.
- For instance, if you run Varnish 7, you can press Export VCL for Varnish 7.
8. Back up your current ‘default.vcl’. After that, rename the ‘default.vcl’ file you just exported to ‘default.vcl’. Then, copy the file to the /etc/varnish/. directory.
cp /etc/varnish/default.vcl /etc/varnish/default.vcl.bak2
mv <download_directory>/varnish.vcl default.vcl
cp <download_directory>/default.vcl /etc/varnish/default.vcl
9. It is suggested to open ‘default.vcl’ and change the value of acl purge to the IP address of the Varnish host. (Specify multiple hosts on separate lines or use CIDR notation as well.)
acl purge {
"localhost";
}
10. Restart Varnish and your web server:
service varnish restartFor Apache servers:
service httpd restartFor Nginx servers:
service nginx restartRedis
Redis is an open-source, in-memory data structure store that can be used as a database, cache, and message broker. If you want to combine Redis as caching software with Magento 2, check out these step-by-step instructions:
1. Install Redis on website hosting.
- If you are using Ubuntu, use the following commands to setup Redis:
sudo apt update sudo apt install redis-server- Follow the path /etc/redis/redis.conf to start Redis configuration. Find how to set up Redis here.
- Enable Redis service with command
sudo systemctl restart redis.service‘ - Check Redis status with command
sudo systemctl status redis
2) To set up Magento 2 with Redis, open file: <Magento install dir>app/etc/env.php and add the following configurations to save Magento cache in Redis:
'cache' =&gt; [
'frontend' =&gt; [
'default' =&gt; [
'backend' =&gt; 'Cm_Cache_Backend_Redis',
'backend_options' =&gt; [
'server' =&gt; '127.0.0.1',
'database' =&gt; '0',
'port' =&gt; '6379'
],
],
'page_cache' =&gt; [
'backend' =&gt; 'Cm_Cache_Backend_Redis',
'backend_options' =&gt; [
'server' =&gt; '127.0.0.1',
'port' =&gt; '6379',
'database' =&gt; '1',
'compress_data' =&gt; '0'
]
]
]
],3) In order to set up caching sessions in Redis, open <Magento install dir>app/etc/env.php and insert the following code:
'session' =&gt;
array (
'save' =&gt; 'redis',
'redis' =&gt;
array (
'host' =&gt; '127.0.0.1',
'port' =&gt; '6379',
'password' =&gt; '',
'timeout' =&gt; '2.5',
'persistent_identifier' =&gt; '',
'database' =&gt; '2',
'compression_threshold' =&gt; '2048',
'compression_library' =&gt; 'gzip',
'log_level' =&gt; '3',
'max_concurrency' =&gt; '6',
'break_after_frontend' =&gt; '5',
'break_after_adminhtml' =&gt; '30',
'first_lifetime' =&gt; '600',
'bot_first_lifetime' =&gt; '60',
'bot_lifetime' =&gt; '7200',
'disable_locking' =&gt; '0',
'min_lifetime' =&gt; '60',
'max_lifetime' =&gt; '2592000'
)
),Note, ‘server’ => ‘127.0.0.1’ і ‘port’ => ‘6379’ is the default value, yet it can differ in some cases.
4) Check whether Redis works with your Magento 2 with the help of the following command: redis-cli ping or redis-cli monitor. The response to your request should be “PONG.”
Memcached
Memcached is a distributed memory cache that speeds up large-scale web applications having dynamic databases. So, to reduce the load of database requests on a server with Redis software, follow a short guide to complete the procedure:
1) Open <your Magento install dir>/app/etc/env.php in a text editor. Locate the following:
'session' =&gt;
array (
'save' =&gt; 'files',
),Change it as follows:
'session' =&gt;
array (
'save' =&gt; 'memcached',
'save_path' =&gt; ':'
),2) After the code is inserted, you should execute the following command in the Console:
rm -rf var/cache/ *var/page_cache/* var/session/*6. Configure a Content Delivery Network (CDN)
Like all the above-mentioned aspects, the end purpose of CDN for Magento is to improve your website performance and enhance the customers’ experience. A CDN is a system of distributed servers that deliver web content to users from multiple locations. CDN is best implemented for sites that desire to reach global traffic. Copies of static assets like images, CSS style sheets, and Javascript files will be stored in different data centers and spread out globally. Among the variety of CDNs on the market, one of the most popular ones is considered Cloudflare. It provides you with an opportunity to protect the online business from harmful bots. The built-in security blocks the threats before they “hit” the server. As a result, you can prevent the server from losing traffic and resources that lead to Magento 2 speed improvement. So, if you want to set up Cloudflare on your Magento 2 website successfully, check out the useful information in the “Magento and Cloudflare: How to Make It Work Right” article.
7. Optimize the Images
Images play an essential role in presenting products and enhancing the visual appeal of a Magento 2 store. At the same time, unoptimized images are one of the most common causes of slow page loading and increased bandwidth usage. Large image files can significantly affect Magento speed performance, especially on category pages and mobile devices.
To reduce this impact, images should be optimized before or during delivery to users. Traditional compression can reduce file size without noticeable quality loss, and tools like Optimizilla may be useful for manual optimization. However, modern ecommerce websites increasingly rely on next-generation image formats such as WebP and AVIF, which provide better compression compared to JPG and PNG while maintaining visual quality.
When properly implemented, these modern formats can reduce image file sizes by up to 50% or more without noticeable loss of quality. For Magento 2 stores with large catalogs or frequently updated content, manual image optimization may be difficult to maintain over time. Using dedicated Magento 2 WebP image optimizer alongside broader performance optimization efforts allows store owners to reduce image-related bottlenecks as part of an overall speed optimization strategy.
Why General Optimization Tips Are Not Always Enough
General Magento site speed optimization tips can help resolve basic performance issues, but they often fall short for growing stores with complex setups, large catalogs, or high traffic. Applying standard recommendations without a deeper performance analysis may lead to limited or short-term improvements.
A properly optimized Magento store, on the other hand, can handle 3x to 5x higher workloads during peak times without compromising functionality. Faster pages not only improve user experience but also boost customer satisfaction, reduce bounce rates, and increase conversion rates. For example, Rakuten experienced a 33.13% increase in conversions after optimizing their Google Core Web Vitals.
If your Magento store remains slow despite applying common best practices, a comprehensive Magento speed optimization service can help uncover hidden performance issues and deliver sustainable results. A team of professionals will help you increase website speed significantly, enhance search rankings, boost sales, and much more.
Bottom Line
Getting your Magento 2 website to the highest performance level can be a challenging and time-consuming task. The above-mentioned tactics can help you simplify the speed optimization process of the online shop and accelerate your business processes. Also, you can take advantage of Magento 2 Speed Optimization Service to save time and effort, as well as open new company opportunities today!